Saturday, December 24, 2011

Turn Ho-Hum Color into WOW! with Photoshop


To see this LAB fix at work pick an image that has color in it but which you think could use a color boost.


Step 1
step1.jpg
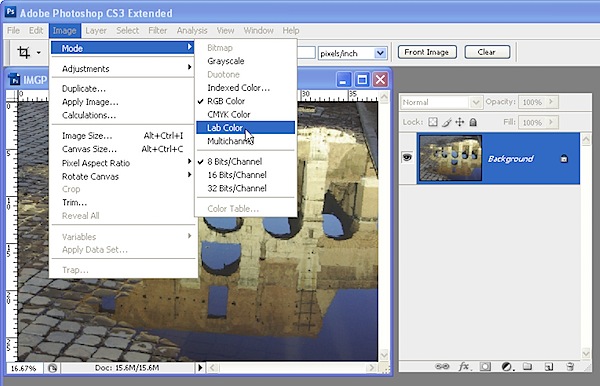
With the flattened image open in Photoshop, choose Image > Mode > LAB Color. If you’re working on a flattened image you won’t see anything except LAB/8 appearing in the title bar of the image.


Step 2
step2.jpg
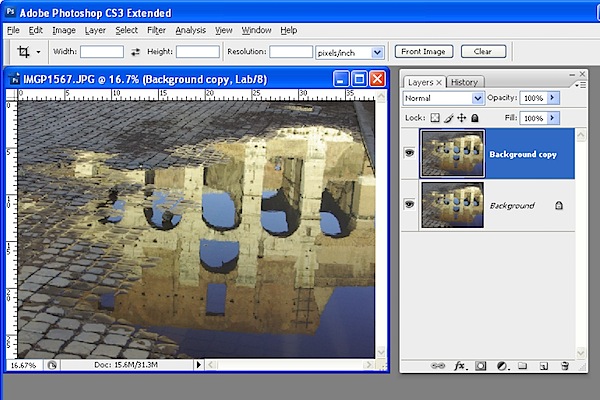
Duplicate the background layer of the image by right clicking it and choose Duplicate Layer. You’ll make your adjustments on this duplicate of the background layer so that you can blend them into the background layer later on.


Step 3
step3.jpg
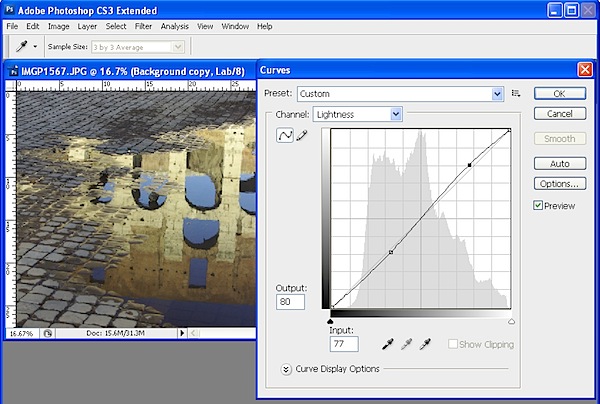
Choose Image > Adjustments > Curves to apply the curves adjustment to the duplicate background layer. Don’t use an adjustment layer as you’ll only have to flatten it on returning to RGB anyway.
In the curves dialog, the L channel is visible on the screen. This channel that contains only lightness and darkness values so that you can drag on the curve to adjust this if desired.


Step 4
step4.jpg
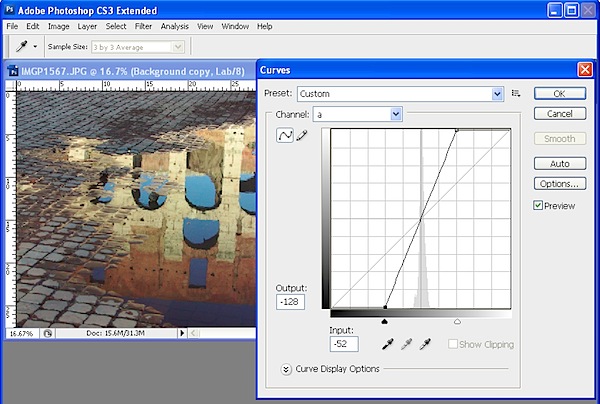
Select the a channel … this is the magenta/green channel. In a standard Photoshop setup green is on the left and magenta is on the right. Drag the bottom edge of the curve inwards 2-3 squares. Then drag the top edge of the curve inwards the same number of squares. It doesn’t matter how many squares you drag but you must drag the same number on either end so the curve line crosses the middle of the grid … this stops you from inadvertently inducing a color cast into the image.


Step 5
step5.jpg
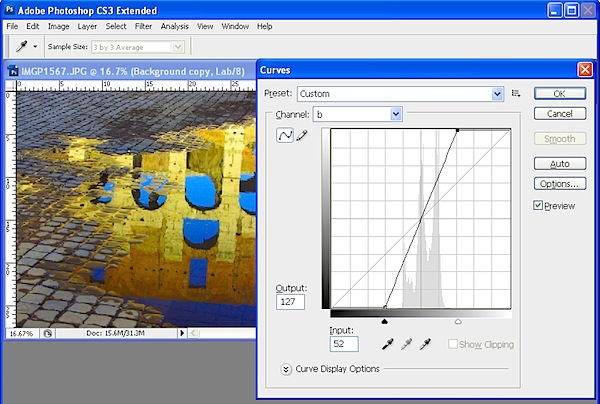
When you’ve adjusted the a curve, repeat the process with the b curve. At this point the image is probably looking very scary indeed. However, you need to make the adjustment strong enough that you get too much color rather than too little at this stage. Click Ok to apply the curve to the top image layer.


Step 6
step6.jpg
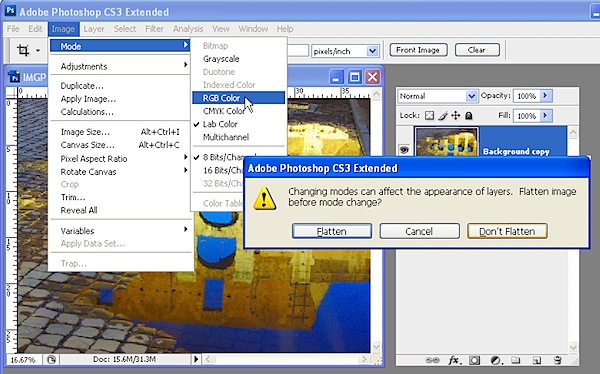
To return to RGB mode choose Image > Mode > RGB Color. When prompted, select the Don’t Flatten option. This is critical because you want both layers intact back in RGB mode.


Step 7
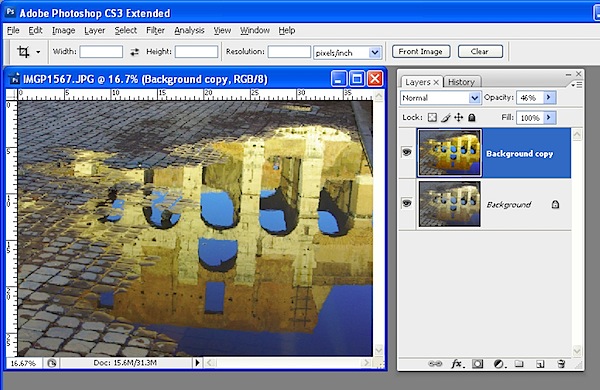
step7.jpg
Now drag the Opacity slider for the top layer back to 0 so you see the original image and slowly walk the slider back up until you get the amount of color you want in your image. When you’re done, save the result.
Once you’ve done this a couple of times, you’ll appreciate how much of a boost in color you can get and how fast you can do it. Record the fix as an action and you can do it in one click and then just adjust the opacity to suit.
In some cases altering the blend mode of the top layer can yield pleasing results. The blend modes in the Overlay, Soft Light, Hard Light, Vivid Light, Linear Light and Pin Light grouping in the Blend Mode list give the best results. You can also duplicate the top layer and apply different blend modes to each copy to bring out different areas of the image.
So, if you want to produce eye-wateringly beautiful color in your photos, chances are that a Lab color fix like this is just what you need.
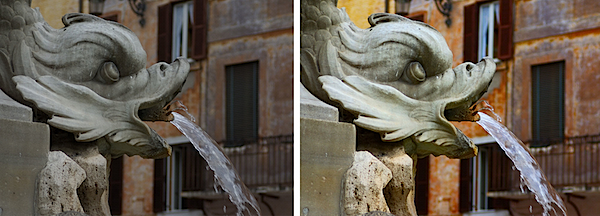
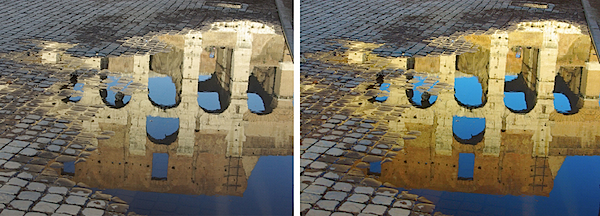
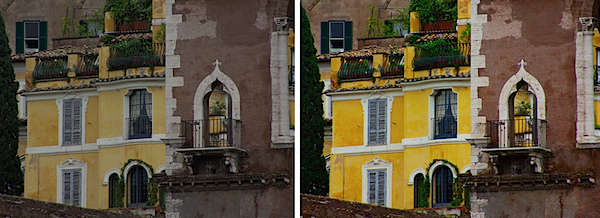
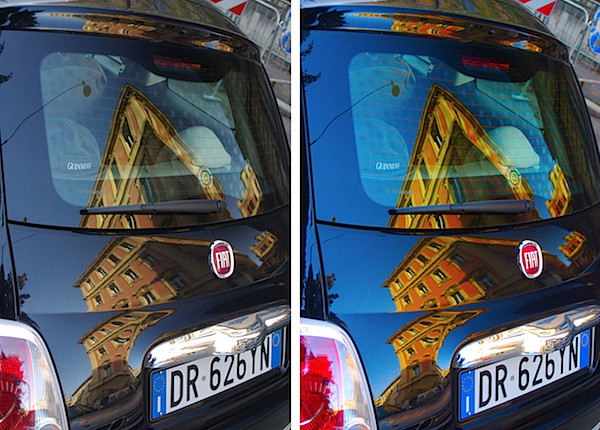
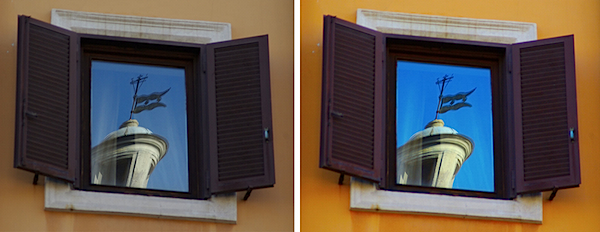
The images below show the original image on the left and the LAB color fix applied to it in the image on the right. No adjustments other than working LAB and blending the resulting layers 
have been used on the right hand versions.


before-after4.jpg 
before-after2.jpg before-after3.jpg before-after5.jpg before-after1.jpg
Post Script: To learn more about LAB color mode and the fixes that you can perform using it, look no further than Dan Margulis’ book— Photoshop LAB Color: The Canyon Conundrum and Other Adventures in the Most Powerful Colorspace … it’s practically the definitive book on Lab by the master of Lab himself.
Wednesday, December 21, 2011

Easy Image Retouching

This tutorial will teach you a simple technique to retouch skin like the professionals. Find out how to make skin look healthy without looking plastic or blurred.


1

Airbrushing Skin Photoshop Tutorial

Step 1

Open the photo into Photoshop. For this tutorial, try to use a high resolution image where you can see the skin texture.

Step 2

Create a duplicate layer and put it into a group. To do this, press Ctrl+J to duplicate the layer then Ctrl+G to place the new layer into a group. Name the group "Airbrush" and the layer "Blur". To retouch the skin, there will be two layers in the Airbrush group. The first layer we’ve created (the Blur layer) will be used to blur the skin. After that, we’ll add another layer to restore the natural skin texture.
2

Step 3

Have the Blur layer selected. To blur this layer, use the Surface Blur filter. This filter blurs like the Gaussian Blur filter except it can retain edge detail. We’ll need to blur the layer so that the skin is smoothed and somewhat blurry without having the edges
3
Here’s what my image looks looks like after the Surface Blur filter. Your image should look similar with details such as the eye intact. If the eye becomes blurry, your settings are too strong. Undo and redo the Surface Blur filter with a lower setting.
4

Step 4

Create a new layer and move it above the Blur layer. Name this layer "Texture" and change the blend mode to Hard Light. This layer, as the name states, will be used to add a slight texture to the skin and also adjust the skin tonality.
5
The texture created in this layer will contribute to the final results very minimally – the difference can only be easily seen zoomed in on high resolution images and varies from image to image. Even though the result is very minimal, it ensures that no area of the skin looks too smooth or plastic.
Below is an example of this. On the left, the image looks like a solid color, also known as plastic skin. The image on the right has a slight noise pattern to make the skin look more realistic.
5a

Step 5

Make sure that you have the "Texture" layer selected. With that layer selected, press Shift+F5 or choose Edit > Fill. In the Fill tool, set the settings according to the image below. This will fill your layer with a 50% gray color.
6

Step 6

Open the Add Noise filter from the Filter > Noise menu. Enter in the settings shown in the image below. This will add some noise to the image that will prevent skin from looking plastic. It may look a little too sharp, but in the next step, we’ll fix this with a Gaussian Blur filter.
7

Step 7

Choose Filter > Blur > Gaussian Blur. Blur the layer by 1 pixel.
8

Step 8

Now we’ll temporarily tint the color of this layer. First, select the Eye Dropper tool from the toolbar. Sample an area on the skin that appears to be the average skin color. You don’t have to be very precise because we will tune the color later in the tutorial. In the Color palette, click on the flyout menu below the close window button and select HSB sliders. We’ll need to see the HSB values for the next step.
9

Step 9

Open the Hue/Saturation tool by pressing Ctrl+U or choosing Image > Adjustments > Hue/Saturation. Check the Colorize option and adjust the hue, saturation, and lightness values to match the HSB values from the color we sampled in the previous step. For the brightness, set this to
10

Step 10

Select the Airbrush group in the Layers palette and add go to Layer > Layer Mask > Hide All. This will create a layer mask filled with the color black that will hide the group. With this layer mask, we’ll paint the areas were we want the skin to appear. Otherwise, this skin airbrushing effect will appear on the entire image.
11

Step 11

First, press D on your keyboard to set the foreground and background colors to the default black and white. Select the Brush tool and apply the settings below.
13
Zoom in to 100% and paint over the skin. The parts that you paint will appear smoother with a different skin tone. Don’t worry if the skin tone doesn’t look correct. This is because we didn’t pick the correct color when we used the Hue/Saturation to tint the "Texture" layer. It’s too difficult to do that without a preview, so we’ll fix that later.
When painting, you’ll need to change the brush size and hardness frequently. It would be tedious to always access the brush option menu to do this so take this as an opportunity to use hot keys. Use the following hot keys to help you with modifying the brush size and hardness:
  • Decrease brush size: [
  • Increase brush size: ]
  • Decrease brush softness by 25%: Shift + [
  • Increase brush softness by 25%: Shift + ]
14
When you’re done, your layer mask should have the skin areas in white and the skin should look smooth.15

Step 12

Now we’re going to fix back the color and tone of the skin as we mentioned earlier in the tutorial. Select the "Texture" layer and press Ctrl+U to access the Hue/Saturation tool. Alter the settings to get a natural looking skin tone.
  • The Hue setting is usually correct. I increased it by 10 to add more yellow to it to make the appearance of the red areas less visible.
  • The Saturation setting usually needs to be reduced greatly. Adjust this until the skin tone looks natural but not too pale.
  • The Lightness setting requires slight modification. A slight change in the lightness will create big difference in how the skin blends in with the image. As you adjust the setting, you will see how sensitive this setting is. Even though it requires high precision, it is easy to tell when it is the correct setting. If it is off, it will look really off. If it is at the correct setting, it will look a lot more natural.
16

Step 13

Finally, we’re going to restore the skin details. Choose Image > Apply Image. Use the settings below.
17
The reason why we’re applying data from the Red channel is because it contains the least skin imperfections. The image below shows the difference in the channels. The red channel hides many of the skin imperfections that are visible in the green and blue channel.
17a

Final Results

Here’s the final results after applying this airbrushing technique. In the image below, you can see how smooth the skin looks. Because the image below has been downsized to fit into this tutorial, it may look slightly plastic. However, when zoomed in, the texture is clearly visible.
18
This is a crop of an area zoomed in 100%. The tiny skin bumps are still visible. Even near the bottom right of the image, it still looks natural because of the "Texture" layer that we added. Without that layer, that area would appear as a solid color with no noise
.19
And as usual, here are the before and after images.
20

Tuesday, December 20, 2011

Call Of Duty MW3 Top Game


Genre: First-Person Shooter
Publisher: Activision
Developer/Co-Developer: Infinity Ward / Sledgehammer Games
Release Date: November 08, 2011
Also on: PS3, X360
Size : 5.20 GB | NFO | Torrent ( bitgamer | iptorrent )

  Modern Warfare is back. On November 8th, the best-selling first person
  action series of all-time returns with the epic sequel to the multiple Game
  of the Year award winner Call of Duty: Modern Warfare 2.
 
  * The definitive multiplayer experience returns bigger than ever.
  * Special Ops co-op reinvented with all-new survival mode.

System Requirements :

OS: Windows® XP/ Windows® Vista / Windows® 7
Processor: Intel® Core™ 2 Duo E6600 or AMD Phenom™ X3 8750 processor or better
Memory: 2 GB RAM
Graphics: Shader 3.0 or better 256 MB NVIDIA® GeForce™ 8600GT / ATI® Radeon™ X1950 or better
DirectX®: DirectX® 9.0c or later
Hard Drive: 16 GB free hard drive space
Sound: DirectX® 9.0c or later
Internet: Broadband connection and service required for Multiplayer Connectivity. Internet connection required for activation

Before Download please click here


Download  
Fileserve

BB-ACR.r00
BB-ACR.r01
BB-ACR.r02
BB-ACR.r03
BB-ACR.r04
BB-ACR.r05
BB-ACR.r06
BB-ACR.r07
BB-ACR.r08
BB-ACR.r09
BB-ACR.r10
BB-ACR.r11
BB-ACR.r12
BB-ACR.r13
BB-ACR.r14
BB-ACR.r15
BB-ACR.r16
BB-ACR.rar

Filesonic

BB-ACR.r00
BB-ACR.r01
BB-ACR.r02
BB-ACR.r03
BB-ACR.r04
BB-ACR.r05
BB-ACR.r06
BB-ACR.r07
BB-ACR.r08
BB-ACR.r09
BB-ACR.r10
BB-ACR.r11
BB-ACR.r12
BB-ACR.r13
BB-ACR.r14
BB-ACR.r15
BB-ACR.r16
BB-ACR.rar

Mediafire

BB-ACR.r00
BB-ACR.r01
BB-ACR.r02
BB-ACR.r03
BB-ACR.r04
BB-ACR.r05
BB-ACR.r06
BB-ACR.r07
BB-ACR.r08
BB-ACR.r09
BB-ACR.r10
BB-ACR.r11
BB-ACR.r12
BB-ACR.r13
BB-ACR.r14
BB-ACR.r15
BB-ACR.r16
BB-ACR.rar

Megaupload

BB-ACR.r00
BB-ACR.r01
BB-ACR.r02
BB-ACR.r03
BB-ACR.r04
BB-ACR.r05
BB-ACR.r06
BB-ACR.r07
BB-ACR.r08
BB-ACR.r09
BB-ACR.r10
BB-ACR.r11
BB-ACR.r12
BB-ACR.r13
BB-ACR.r14
BB-ACR.r15
BB-ACR.r16
BB-ACR.rar

Putlocker

BB-ACR.r00
BB-ACR.r01
BB-ACR.r02
BB-ACR.r03
BB-ACR.r04
BB-ACR.r05
BB-ACR.r06
BB-ACR.r07
BB-ACR.r08
BB-ACR.r09
BB-ACR.r10
BB-ACR.r11
BB-ACR.r12
BB-ACR.r13
BB-ACR.r14
BB-ACR.r15
BB-ACR.r16
BB-ACR.rar

Wupload

BB-ACR.r00
BB-ACR.r01
BB-ACR.r02
BB-ACR.r03
BB-ACR.r04
BB-ACR.r05
BB-ACR.r06
BB-ACR.r07
BB-ACR.r08
BB-ACR.r09
BB-ACR.r10
BB-ACR.r11
BB-ACR.r12
BB-ACR.r13
BB-ACR.r14
BB-ACR.r15
BB-ACR.r16
BB-ACR.rar